Fancy Rib Hat (with folded up brim) | Free Crochet Pattern
The Fancy Rib Hat is a beautiful crochet hat with folded up brim, warm and comfy, perfect for cold fall or winter days.
The featured ribbed pattern gives lots of (knit-like) texture and stretch!
You can wear the hat as fitted or as slouchy as you like, by folding the brim up more or less.

*Disclaimer: This post includes affiliate links and at no additional cost to you, I might earn a small commission if you decide to purchase through these links. Thank you!
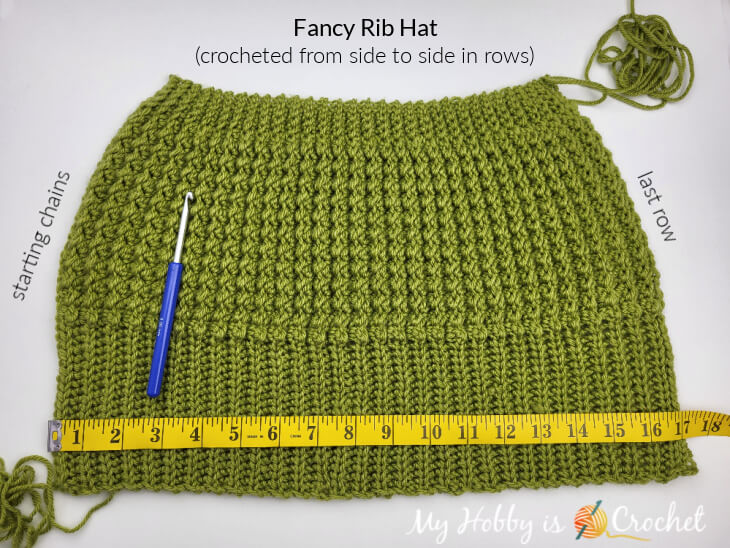
The hat is worked from to side in rows, back and forth as one piece, with the brim at one end of the row and the top of the hat at the other end of the row.
The crown (or top) of the hat will be shaped with the help of shorter stitches, such as single crochet and slips titch.
The piece is then seamed together with an invisible seam and the brim is folded up. The top of the hat is cinched together to close the hole.
Fancy Rib Hat

SIZE
The hat is sized to fit teen/ adult women, but it is easily customizable to any sizes.Hat total height without folding the brim up: 11 inches (29 cm)
You can easily adjust the width of the hat by working less/more rows as in the pattern indicated.
Notes
The height of the hat will be determined by the length of the foundation chain and the hat circumference will be given by the number of rows. The piece has a lot of stretch.Depending on your own work tension, you might need to crochet more/ fewer rows as in the pattern indicated. For best results, please try it on the recipient's head. If it is too wide, before closing the top, you can still unravel a few rows; if it is too tight, you can work some additional rows.
GAUGE
Without stretching the piece: 16 sts and 14 rows = 4” x 4” (10 cm x 10 cm) in the ribbing stitch used for the body of the hat (see the pattern below)
SUPPLIES:
- Yarn:
For this hat I was used Debbie Bliss Cashmerino Aran in colorway Lime (or 300502) from Love Crafts.
Debbie Bliss Cashmerino Aran is a blend of premium merino wool and luxurious cashmere machine washable at 30° Celsius.
(It was the first time for me working with this yarn and I loved it! So soft! It was a pleasure to work with it! )
Yarn weight: Aran/ 4 Medium)
Ball weight: 50 g (1.75 oz)
Length: Ca. 98yds (90m)
For the hat I have used 110 g of yarn, so you will need just a bit more than 2 balls of yarn. - 5mm crochet hook
- yarn needle
- scissors
- stitch markers or yarn in other color (optional)
- If you prefer, add a Faux Fur Pompom
Yarn Substitutes You can substitute the Debbie Bliss yarn with another yarn of choice, but make sure it has the same yarn weight and it meets the gauge.
You can check out the Yarnsub site to see what is the closest yarn to Debbie Bliss Cashmerino Aran.
STITCHES AND ABBREVIATIONS (US TERMS)
ch: chainback bump of chains Click here for my tutorial!
st: stitch
slst : slip stitch
slst blo: slip stitch back loop only
sc: single crochet
sc blo: single crochet back loop only
dc:double crochet
dc blo: double crochet back loop only
( ) work the stitches between the parentheses in same stitch indicated in the pattern
[ ] repeat the sequence of the stitches in the bracket specified number of times
Special Stitches:
- Yarn Over Slip Stitch (yo-slst): Yarn over (yo) and insert the hook into indicated st; yarn over and draw the yarn through (You have now 3 loops on the hook). Having the 3 loops on hook, pull/slip the first loop on hook through the next 2 loops on hook to complete a Yarn Over Slip Stitch (yo-slst). Click here for my TUTORIAL!
- Yarn over slip stitch back loops only (yo-slst-blo): work the stitch as described above, but inserting the hook only into the back loops of the stitches.
NOTES
- the ch1 at beginning of the rows will not count as a st
- Do not work the slip stitches at the beginning/ end of the rows tight; otherwise it will be difficult the next row to insert the hook into them; or you might even unsee them! Work the slsts taller!
- Starting with the second row you will work all sts into the back loops only, excepting the last st of the uneven row. The last st of the uneven rows will be worked inserting the hook under both top loops. This will make for a prettier edge.
- Use a stitch marker to mark the start of the brim stitches. I found it easier and less annoying to mark my stitches with a piece of scrap yarn in a contrasting colour that I carried from row to row.
- The stitch pattern is reversible, but on one side the edge of the brim looks better when folded up. Choose that as the right side.
HAT INSTRUCTIONS
Leaving a long tail that will be used later to join the sides, Ch 50.
Row 1 (WS): work all sts into back bumps behind chains:
1 slst in 2nd ch from hook and 1 slst in next ch, 1 sc in each of next 3 ch,
[sk 1 ch, work (1sc, 1 dc) in next ch] × 12 times, 1 yoslst in each of next 20 ch; ch 1, turn.
(49 sts total)
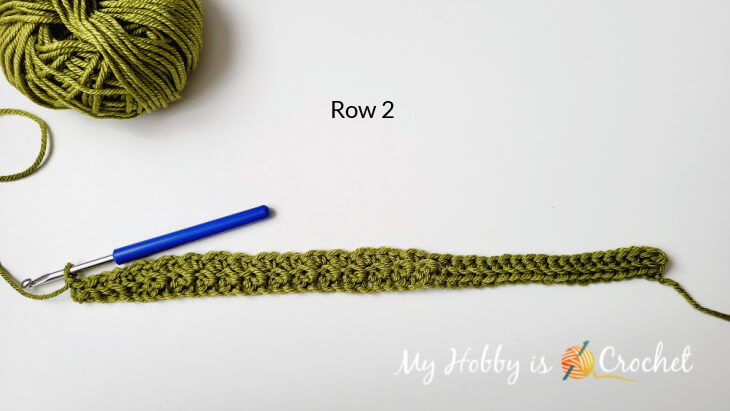
Here is how the 1.st row will look like. On the right, is the part with the slip sts that will form the top; on the left is the part with yo-slsts that will form the folded up brim.

Row 2 (RS): 1 yoslst-blo in each of the next 20 yoslsts,
[sk next dc, work (1sc, 1 dc) in next sc] × 12 times, 1 sc-blo in each of next 3 sc, 1 slst-blo in each of next 2 slsts; ch 1, turn.
(49 sts total)
Row 3 (WS): 1 slst-blo in each of next 2 slsts, 1 sc-blo in each of next 3 sc,
[sk next dc, work (1sc-blo, 1 dc-blo) in next sc] × 12 times, 1 yoslst-blo in each of the next 19 yoslsts, 1 yoslst in last st inserting hook under both top loops.
(49 sts total)

From row 4 to row 60 you will repeat as rows 2-3. ( You will alternate one row as row 2 and one row as row 3.)
You will end with a Row 2 repeat ( worked from the bottom brim end to the top). Cut yarn leaving a long tail that will be used to close the hole on top of the hat.
After finishing 60 rows you will have 30 relief ridges with the sc blo + dc blo on the side you finished the last row, as seen in the picture below.
Joining the sides into a tube:
A. Provisional Joining with the slip stitch
Now you can quickly slip stitch the sides together to join into a tube and try the hat on your head to see if it fits well.
If it is too tight, you can unravel the joining seam and work a few more repeat rows.
Please take in count that the hat will loosen up a bit in time.
If it is too loose, you can unravel some rows.
Now you can leave the joining as it is,or you can try my almost invisible join below, that will mimic the look of the ribbed pattern!
B. Sewing an invisible seam
For a nice, almost invisible seam, unravel the slip stitch joining seam and join the sides again by sewing them together as instructed below.
Turn the piece on the wrong side (the side you choose as your wrong side); fold it in half on the width; hold Row 1 edge on last row edge as pictured below. Thread a yarn needle with the yarn tail left at the beginning of the work and sew the edges together back and forth this way:
Along the yoslst ribbing inserting the needle through the front loops of the sts on the edge most nearest to you and the back loops of the corresponding sts on the other edge. For the body part of the hat you will insert the needle though the back loops of the sts on the edge most nearest to you and the front loops of the of the corresponding sts on the other edge.
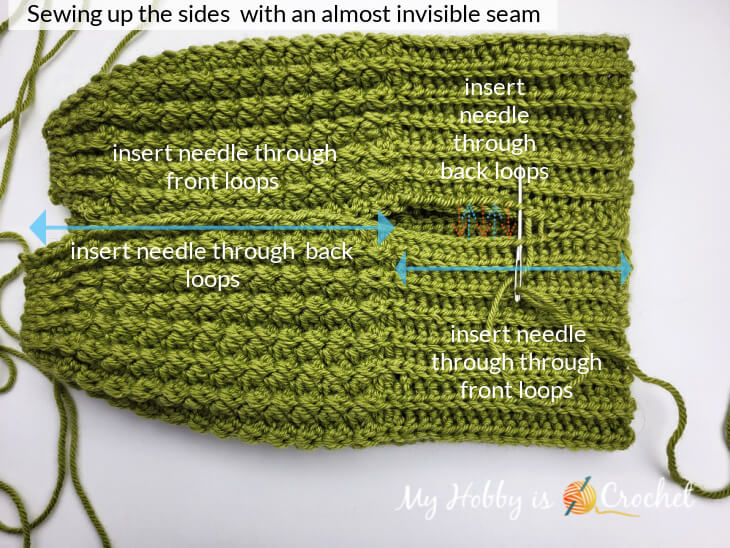
Now turn the hat inside out. This will be the right side. If you fold the brim up, you will see that the seam created imitates the stitch pattern for the brim and for the body part as well.
See how my joining looks like in the picture below.

Closing the hole on top of the hat
With yarn needle and long strand of yarn, weave yarn through ridged slip stitches at top of hat. Cinch together to close space, and fasten securely. Weave in all ends.
And you're done! If you prefer, you can add a pompom.
I hope you enjoy this pattern!
For more free crochet patterns and tutorials, please visit my FREE Crochet Pattern Page!
Don't miss out new free crochet patterns, tutorials and other updates from My Hobby is Crochet! Subscribe to our FREE Newsletter and follow My Hobby is Crochet on Facebook, Pinterest, Instagram and YouTube.
Fancy Rib Hat
Written Instructions and Pictures - Copyright © October 2022 Kinga Erdem
This pattern is free for your personal use, you can sell the products of your work, a link back to my blog would be appreciated.
Do not use my photos for selling purposes or modify them in any way.
Please don't repost the pattern itself to any other sites, but please share the link to the pattern if you want to share the pattern with your friends.
You may not give away copies of this pattern.
Do not make video tutorials or translate my pattern in other languages without my written consent!
Thank you.
Kinga


Thank you for excellent instructions and your generous sharing…..will be happy hooking this weeks
ReplyDeleteYou're very welcome! Please enjoy! If you make the hat, please send me a picture or tag me on social media #myhobbyiscrochet or #myhobbyiscrochetpattern.
DeleteThanks
Kinga
Beautiful pattern. Thank you. I wish there was a link to printing it. I'm old school and like printing my favorites, :)
ReplyDeleteCopy and paste into a word document and then print it. More time consuming but then you still have it printed. Most will have you pay for the pdf to print - she may have that option...?
DeleteThank you for this beautiful pattern. Do you ever sell PDF, downloadable, versions of your patterns? I would have liked to either print this pattern or save it on my laptop. Thank you
ReplyDeleteHi, Just wanted to say I love this hat! Thanks for sharing your pattern. Will tag you as soon as I get a few made. I can see me making this in several different colors.
ReplyDeleteIf I were to add more chains to the foundation chain, how should I be following the rest of the steps to account for more chains?
ReplyDeleteHi, it depends what you would like to make higher! The brim or the main body of the hat? For the main body you will add more chains in multiple of 2. For the brim you can add either an even or an uneven number of chains, it doesn't matter, just make a gauge check first, maybe a few rows following the pattern as it is, to see what you would like make higher.
DeleteYou are a lifesaver , your patterns and especially your video tutorials are simply the BEST. thank you. 🙏
ReplyDeleteThank you! I'm so glad you enjoy my patterns and video tutorials! :)
DeleteAt the end of row 3 do I ch 1?
ReplyDeleteThis is an easy pattern but not a quick hat to make. I will save it for myself instead of donating. Thank you!
ReplyDeleteHi i was following your pattern and realized my piece was shrinking then realized that the sk skips were causing this and since sk was not in your abbreviations list I'm wondering if it's not meant to be sc instead or maybe I was supposed to ch 1 for the skips but that is not listed either.
ReplyDeleteHi I was using your pattern and experienced some confusion with the sk abbreviation I searched it and it said skip so I was making it with this in mind but my piece for progressively smaller so I was wondering if sk was a typo for SC or if you meant to add a ch1?
ReplyDelete