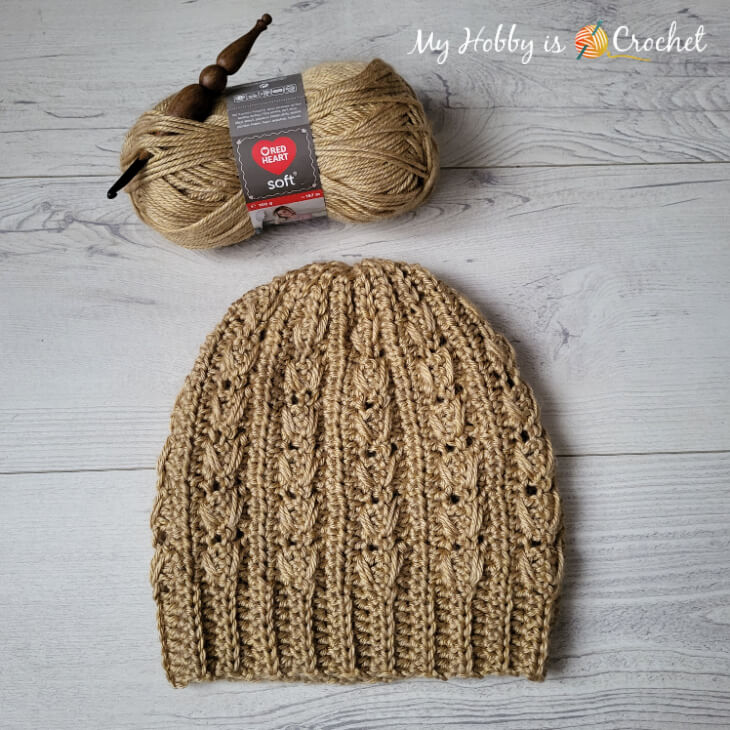
Wheat Hat | Free Crochet Pattern
As promised, here is the Wheat Hat crochet pattern, to match the previously published Wheat Scarf.
Together they make a beautiful textured winter crochet set. I hope you love them as much as I do! :)

*Disclaimer: This post includes affiliate links and at no additional cost to you, I might earn a small commission if you decide to purchase through these links. Thank you!
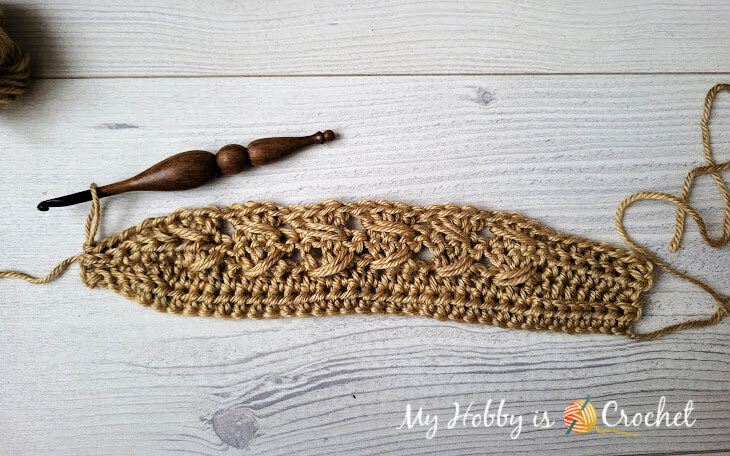
Like many of my crochet hat patterns, the Wheat Hat is worked as one piece from side to side, in rows, shaping the top part with shorter crochet stitches.
After seaming/slip stitching the short edges together, the top of the hat will be cinched together to close the hole on top.
SIZE
The hat is sized to fit teen/ adult women.Hat height: 10 inches (25 cm)
The height of the hat will be determined by the length of the foundation chain and the hat circumference will be given by the number of rows.
For a longer/shorter hat, start with more/less foundation chains.
For a wider/ narrower hat add more/less rows in the pattern repeat of 4 rows.
GAUGE
13 hdc sts and 8 rows in pattern repeat = 10 cm x 10 cm (4” x 4")
SUPPLIES:
- 1 skein (100 g) of aran, medium weight yarn.
I have used Red Heart Soft, in Wheat colorway - Crochet Hook: 5.5mm Furls Alpha Series
- Scissors
- optional stitch marker
STITCHES AND ABBREVIATIONS (US TERMS)
- ch: chain- back bump of chains: Click here for my picture tutorial.
- st: stitch
- hdc: half double crochet
- dc: double crochet
- blo: back loop only
- hdc blo: half double crochet worked in back loop only
- RS: right side of work
- WS: wrong side of work
Special Stitches:
Cross-over Double Crochet Cable (crossed dc cable): skip next st, work 1 dc in each of the next 3 sts. Working over the 3 dc’s just made, yarn over and insert hook into skipped st.
Pull up a loop to the height of the dc’s, yarn over and pull through first 2 loops on the hook, yo and pull though the next 2 loops on hook to complete a long double crochet (Ldc)!
The 4 sts made will create a cross-over cable.

Cross-over Half Double Crochet Cable (crossed hdc cable): skip next st, work 1 hdc in each of the next 3 sts. Working over the 3 hdc’s just made, yarn over and insert hook into skipped st. Pull up a loop to the height of the hdc’s, yarn over and pull through all 3 loops on the hook to complete a long half double crochet (Lhdc) ! The 4 sts made will create a cross-over hdc cable.
NOTES
- the ch1 at beginning of the rows will not count as a st
- Do not work the slip stitches at the beginning/ end of the rows tight; otherwise it will be difficult the next row to insert the hook into them; or you might even unsee them! Work the slsts taller!
- If you like, you can use a stitch marker to mark the start of the brim stitches
Wheat Hat

HAT INSTRUCTIONS
Leaving a long tail that will be used later to join the sides, Ch 38.
Turn the foundation chains to work the 1st.row into the back bumps behind the chains.
Row 1 (WS): 1 slst into 2nd. ch from hook and 1 slst in next ch, 1 sc in each of next 2 ch, 1 hdc in each of next 33 ch; ch1, turn (37 sts total)

Row 2 (RS): 7 hdc blo (this will form the brim), 24 hdc (the hat body), 2hdc blo, 2 sc blo, 2 slst blo (the top of the hat); ch1, turn (37 sts total)

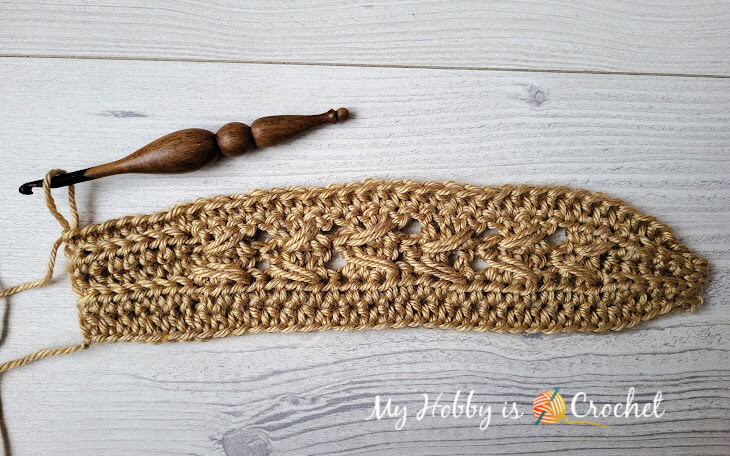
Row 3 (WS): 2 slst blo, 2 sc blo, 2 hdc blo,
1 crossed hdc cable, 5 crossed dc cables, 6 hdc blo, 1hdc in last st; ch1, turn
(37 sts total)

Row 4 (RS): 7 hdc blo, 5 crossed dc cables, 1 crossed hdc cable, 2 hdc blo, 2 sc blo, 2 slst blo; ch1, turn.
(37 sts total)
Row 5 (WS): 2 slst blo, 2 sc blo, 2 hdc blo, 24 hdc, 7 hdc blo; ch 1, turn.
(37 sts total)
Row 6 (RS): 7 hdc blo, 24 hdc, 2 hdc blo, 2 sc blo, 2 slst blo; ch1, turn.
(37 sts total)
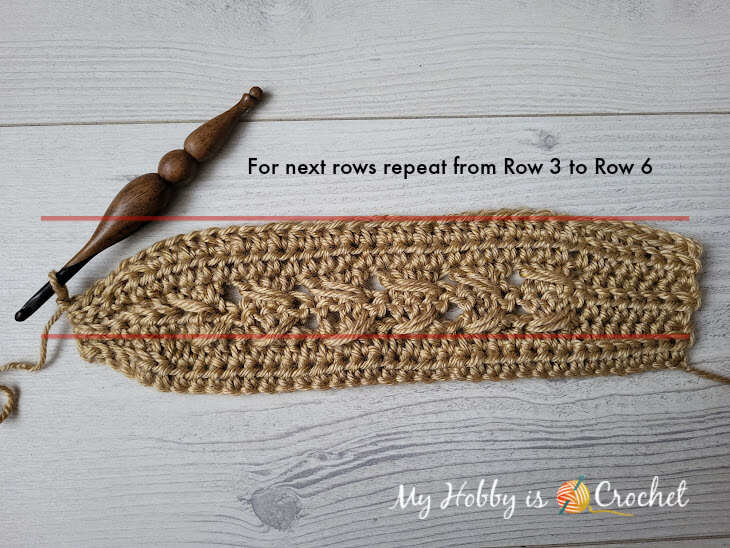
Rows 7- 40: repeat from Row 3 to Row 6 ; the last 2 rows should be with the crossed cables as Row 3 and Row 4.
(37 sts total)

Cut yarn leaving a long tail that will be used to close the hole on top of the hat. Finish off.
Joining the sides into a tube:
Using the yarn tail you left at the beginning of the work, use your crochet hook to slip stitch the sides together (or thread a yarn needle with the yarn tail and sew the sides together). Both methods are good, but I prefer sewing, this way the seam is almost invisible.
Closing the hole on top of the hat
Thread a yarn needle with the second yarn tail, weave yarn through slip stitches at top of hat. Cinch together to close space, and fasten off securely, making several knots. Weave in all ends.I hope you enjoy this pattern!

Want more crochet hat and scarves/cowls in set?
You might like these:
- Go with the Flow Hat and Scarf
- Bex Hat and Scarf
- Mock Cable Hat and Cowl
- Sparkle Ruby Hat and Cowl
- Hypnotik Heart Hat and Cowl
Don't miss out new free crochet patterns, tutorials and other updates from My Hobby is Crochet! Subscribe to our FREE Newsletter and follow My Hobby is Crochet on Facebook, Pinterest, Instagram and YouTube.
Wheat Hat
Written Instructions and Pictures - Copyright © November 2023 Kinga Erdem
This pattern is free for your personal use, you can sell the products of your work, a link back to my blog would be appreciated.
Do not use my photos for selling purposes or modify them in any way.
Please don't repost the pattern itself to any other sites, but please share the link to the pattern if you want to share the pattern with your friends.
You may not give away copies of this pattern.
Do not make video tutorials or translate my pattern in other languages without my written consent!
Thank you.
Kinga


Any chance there is a row of single crochet between 3 and 4? Otherwise the crossed stiches of the cable are on the opposite sides of my work instead of creating the cable?
ReplyDeleteI was struggling with this too, but I finally figured out that instead of looping over the front for the cable in row 4 you loop behind
DeleteIf you want to do this pattern with 1 (super fine) yarn, how would you convert this pattern to fit? I have some beautiful red yarn I would like to use for this but it's not coming out right. How many more stitches would I need to add on the foundation chain? I have 1 (super fine) yarn and 3.75mm hook :) I love this hat pattern!
ReplyDeleteHi. This is a cool hat. I was wondering what is the multiple needed to adjust the sizing of the hat? (the increase or decrease). Thank you so much for the information and for sharing your beautiful pattern
ReplyDeleteThis pattern is super easy to follow, and turned out beautiful!!
ReplyDeleteThank you 😊
Awesome! I'm so glad you enjoyed the pattern! If you can, please share a picture on my Facebook page. Thanks! Kinga
Delete