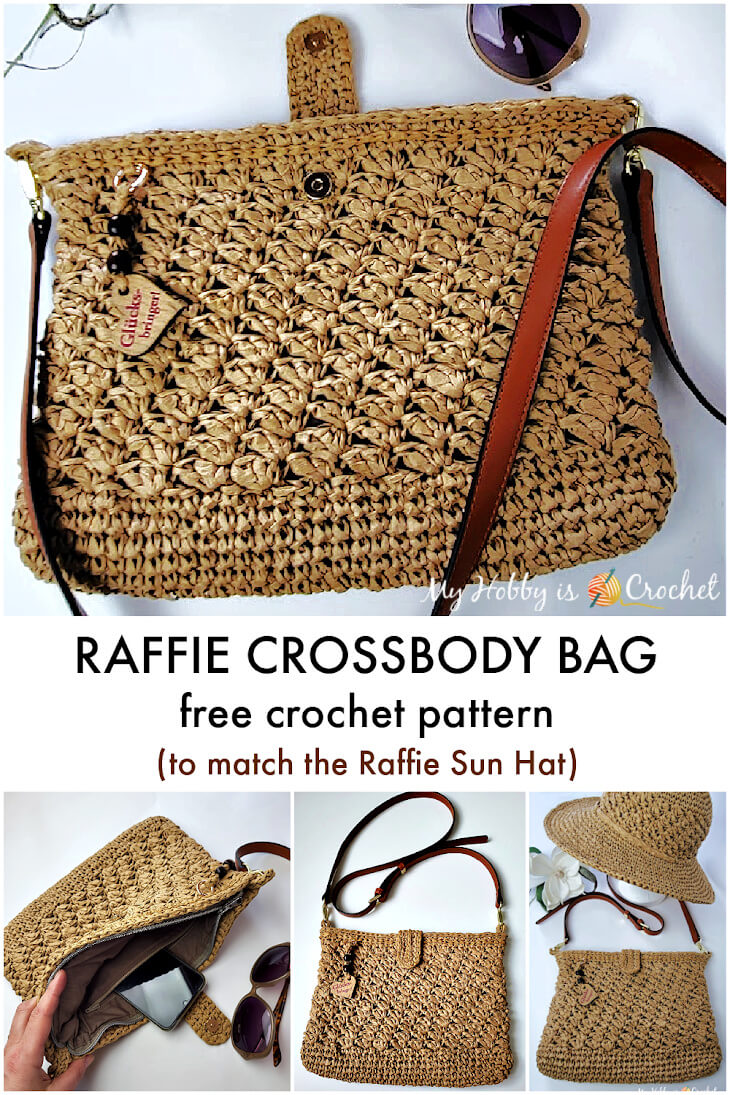
Raffie Crossbody Bag | Free Crochet Pattern
Looking for a stylish and practical crochet crossbody bag pattern for summer?
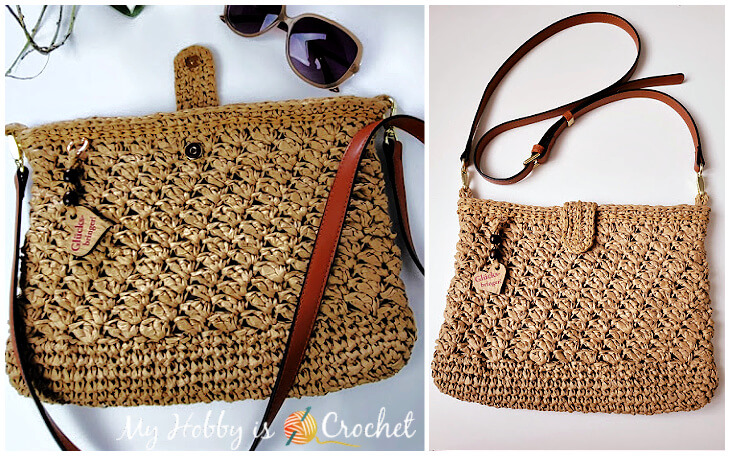
The Raffie Crossbody Bag is a beautiful handmade accessory that combines functionality with modern crochet texture. Worked with raffia paper yarn and an eye-catching diagonal stitch pattern, this lightweight bag is perfect for everyday use during warm weather.
*Disclaimer: This post includes affiliate links and at no additional cost to you, I might earn a small commission if you decide to purchase through these links. Thank you!
Designed to hold your daily essentials such as your phone, wallet, sunglasses, and cosmetics, this crochet purse is both compact and surprisingly roomy. The natural raffia texture gives the bag a trendy straw-bag look that pairs perfectly with summer outfits, beachwear, or casual everyday style.
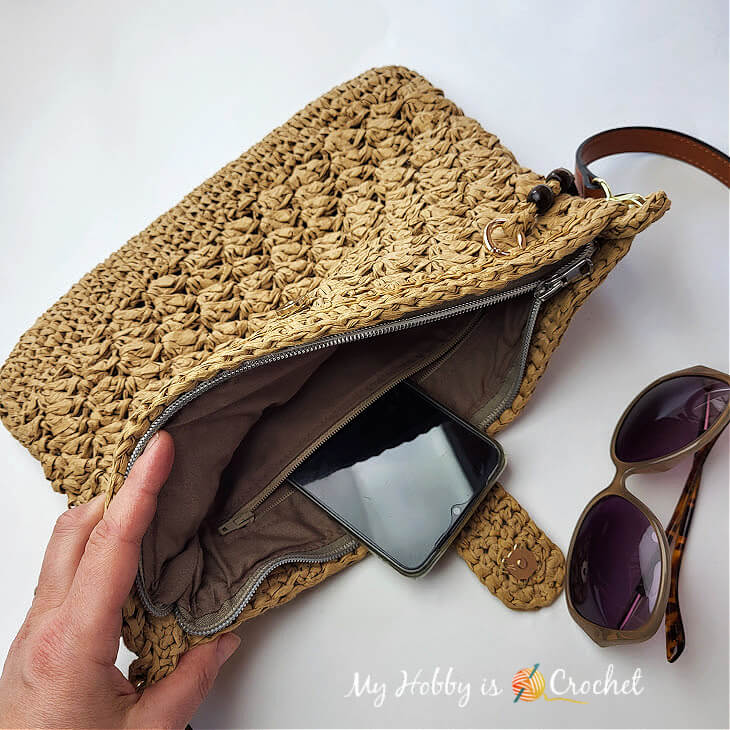
For a more polished and durable finish, the bag can be lined with fabric and fitted with a zipper pocket, giving it extra structure and security. Whether you are heading to the market, enjoying a summer walk, or traveling light, this crochet raffia bag pattern is a fun and rewarding project to make.
I have designed this bag to match my Raffie Sun Hat, so that I have a cute set to wear in the summer. But sure, you can just crochet the bag if you want.

To make this bag you can use Raffia paper yarn as I did, or you can replace it with a yarn of your choice that meets the gauge.
Although it is a bit rough to work with Raffia paper ribbon, I just love the look and feel of this bag.
For a more polished look I have lined my bag with fabric and even sewn a bag pocket with a zipper.
I am by no means experienced with machine sewing. To make the fabric lining I have watched some sewing video tutorials on YouTube, that I have linked below in this post.
It came out better than I hoped! Yeey! :)
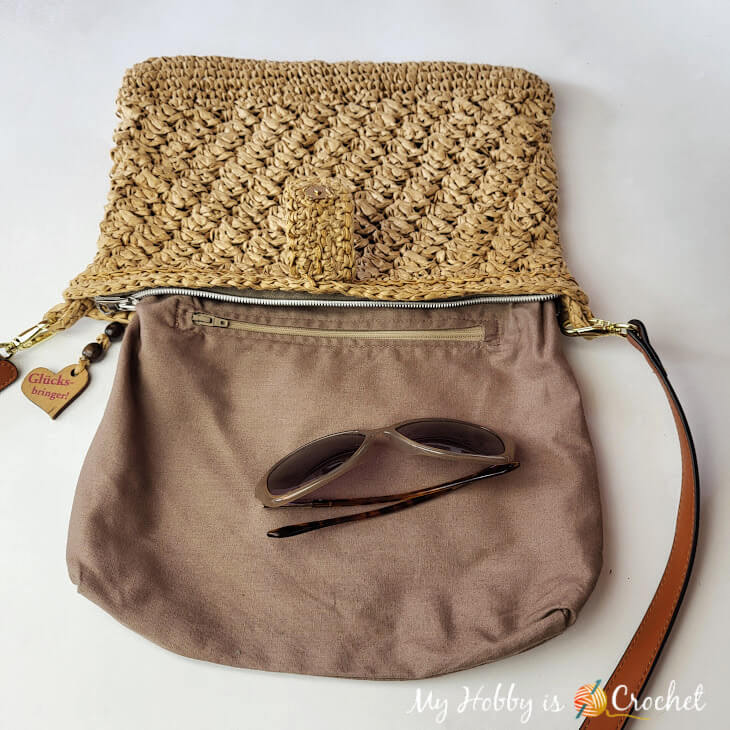
If you wish, you can also add a lining, or simply leave it out, but I have noticed that the bag has more stability when adding a lining and a zipper.
The zipper is a good choice to add, on one hand because you will feel more secure and on the other hand it gives a better look, keeping the top of the bag closed.
Raffie Crossbody Bag
SIZE
Width: 12 in (30 cm)Height: 8.7 in (22 cm)
GAUGE
6 sts and 6 rounds in single crochet = 5cm x 5cm (2”x2")SUPPLIES
• 1 roll of Raffia paper yarn Raffia Paper Craft Ribbon Packing Paper Twine, 1/4 Inch by 218 Yards (200 meters)
I have used 160 gr total of Raffia.
• 4.5 mm crochet hook
• 5 mm crochet hook
• 1 stitch marker
• Yarn Needle
• Scissors
• Measuring tape
• Magnetic button clasp snap
• crossbody bag strap
I have used an adjustable synthetic leather bag strap that is 0.47” (1,2 cm) wide and 43”-51” (109cm -129cm) long. The bag strap has integrated metal snap hooks.
I bought mine on Amazon Germany.
Here is a similar (but not the same) adjustable bag strap one on Amazon US.
• Sewing Thread in corresponding color and sewing needle
• Sewing pins
Optional Supplies
• 2 wooden beads with larger hole and a wooden heart for the “lucky charm” bag pendant
• small snap ring (2cm in diameter) to insert the “lucky charm” into the bag
• 13.8 inch (35 cm) closed zipper
• 8 inch (18 cm) zipper for bag pocket
• fabric for lining (if you add a lining to your bag)
• Iron and ironing board
If you like, you can add a lining to your bag. You can sew the lining by hand, but I would recommend using a sewing machine for fast work and a more professional look. Then sew the lining by hand to the bag.
I am not experienced with machine sewing, but I have managed to make a pretty good job with the help of some video tutorials on YouTube from KnitcroAddict!
I have even sewn a bag pocket with a zipper inside the bag. Yeyy! :)
Then I have hand sewed the lining to the Raffia bag.
Here are the Video Tutorials that helped me:
- How to sew a lining into a crochet bag/ how to make a zipper lining
- How to make a lining for crochet bag (this one shows how to make the pocket also!)
- How to add a zipper and a lining to a crochet bag ( Picture tutorial by Heart Hook Home)
STITCHES, TERMS (US) AND ABBREVIATIONS
ch: chain
Back bump of chains (click on the link to open the page with my tutorial)
sc: single crochet
hdc: half double crochet
dc: double crochet
slst: slip stitch
group = here: work (1sc, 1 hdc, 1dc) into same stitch
* to * : repeat the sequence of stitches between the stars
sk: skip
beg: beginning
Invisible Finish Off: after working the last st of the last round, do not join into round with slst, instead cut yarn leaving a few inches tail; thread yarn needle with the yarn tail, insert the needle from back to front under both tops loops of the 1.st st at beg of round, pull through the stitch, then insert needle between the front and last loop of the last st and pull yarn though. Weave the yarn end in.
Surface crochet
NOTES
1. The bag is started at the bottom.
2. You will crochet a few rounds worked in spiral rounds, without slip stitching to join at the end of each round.
3. To keep track of the rounds, place a stitch marker into top of first stitch of the round; move the stitch marker as you go, placing it always into the first stitch of each round.
4. How to join into round with slip stitch: at the last stitch, remove the loop on the hook; insert hook from back to front into both top loops of the first stitch of the round, catch the loop you removed from the hook and pull it though the stitch from front to back.
INSTRUCTIONS:
With hook size 4.5 mm start with ch 33.
Round 1: Work into the back bumps behind the chains 1sc in 2.nd ch from hook and 1sc in each of the next 30 ch, work 3 sc in last ch; do not turn!
Continue working along the other side of the foundation chain inserting the hook under both unworked loops of the chains (this way you will not have holes at the bottom of your bag!):
1 sc in each of the next 30 sc, 2 sc into 1.st ch at the beg of round.
Do not join with slst! Continue working in spiral rounds!
(66 sts total)
Round 2: 2 sc in 1st. st, 1 sc in each of next 30 sts, 2 sc in each of the next 3 sts, continue working on the other side 1 sc in each of next 30 sts, 2 sc in each of next 2 sts. Do not join with slst!
(72 sts total)
Round 3: 1 sc in each st around, join with slst to top of 1st sts at beg of round.
(72 sts)
Rounds 4-6: Change to 5mm crochet hook and work the same as round 3.
Continue working with the 5mm crochet hook!
Round 7: ch1, work (1sc, 1 hdc, 1 dc) into first sc, sk 2 sc, work *(1sc, 1 hdc, 1dc) into next sc, sk 2 sc *, repeat from * to *, slst to top of 1st. sc.
( 24 groups total)
Rounds 8-20: ch 1, work (1 sc, 1hdc, 1 dc) into first sc, sk (1 hdc and 1dc) of next group, *work (1 sc, 1 hdc, 1 dc) into next sc, sk (1 hdc and 1 dc) of next group*, repeat from * to *, slst to top of first sc.
( 24 groups total)
Change to hook size 4.5 mm!
Rounds 10-11: ch1, work 1 sc in each st around, slst to top of first sc
(72 sts total )
Round 12: ch1, work 1 slst loosely in each st around, fasten off invisibly. Weave in all yarn ends.
Embellishing the top of the bag with surface crochet:

Side Tabs (Make 2):
With 4.5 mm crochet hook chain 15. Working into back bumps of chains, sc in 2nd ch from hook and sc in each ch across. Fasten off living a long tail that will be used to sew the side tab to the bag. The tab is 5 inches long.
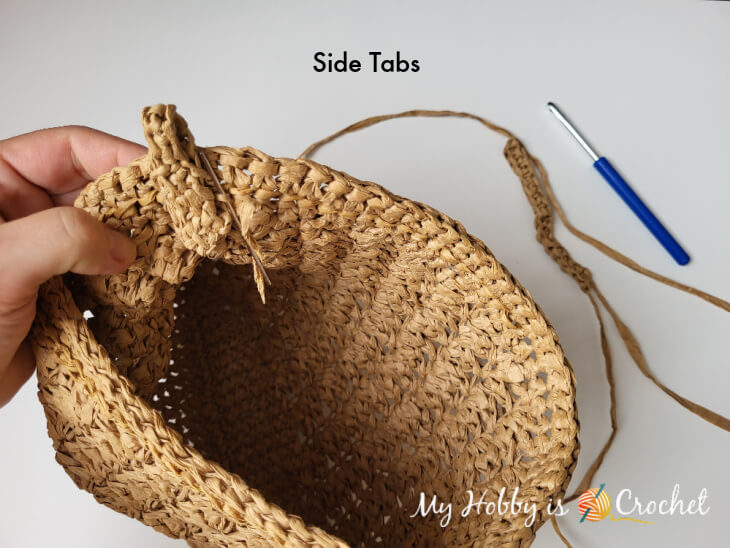
If desired, now is the time to add a zipper and lining to your bag! (See the tutorials linked above on the page.)
Closing Tab:

Round 1: work 1 sc in 2nd ch from hook and 1 sc in each of next 7 ch, 3 sc in last ch, continue working on the other side of the foundation chains, 1 sc in each of next 7 ch, 2 sc in last ch. Do not join with slst; continue working in spiral rounds. ( 20 sts)
Round 2: 1 sc in 1st st and 1 sc in each of next 7 sts, 2 sc in each of next 3 sts, 1 sc in each of next 7 sts, slst in last 2 sts. Continue working in spiral round (23 sts)
Round 3: sl st in each st of the previous round. (23 sts) Do not cut yarn. Sl st to middle of the piece and work 10 surface slst through the middle of piece from one end to the other end.
Sewing the closing tab onto the bag:
Thread some raffia through the yarn needle.
With the right side of the bag facing you, fold the bag into half on the width to find the middle of the top edge. Center the closing tab on the backside of the bag and pin it down right over the last 2 rows of the bag (just above the surface crochet row).
Sew the closing tab securely onto the bag. Cut yarn and weave in all ends.
Sew the magnetic button clasp snap
Thread sewing thread onto sewing needle.
From the top (hanging end) of the closing tab, leave one finger width and sew securely the top part of the magnetic button clasp onto the closing tab, making sure that the snap is centered.
Now all you have to do is to attach the bag strap, inserting the integrated metal snap hooks in the side straps.
Optional: Add a “lucky charm” to the bag.
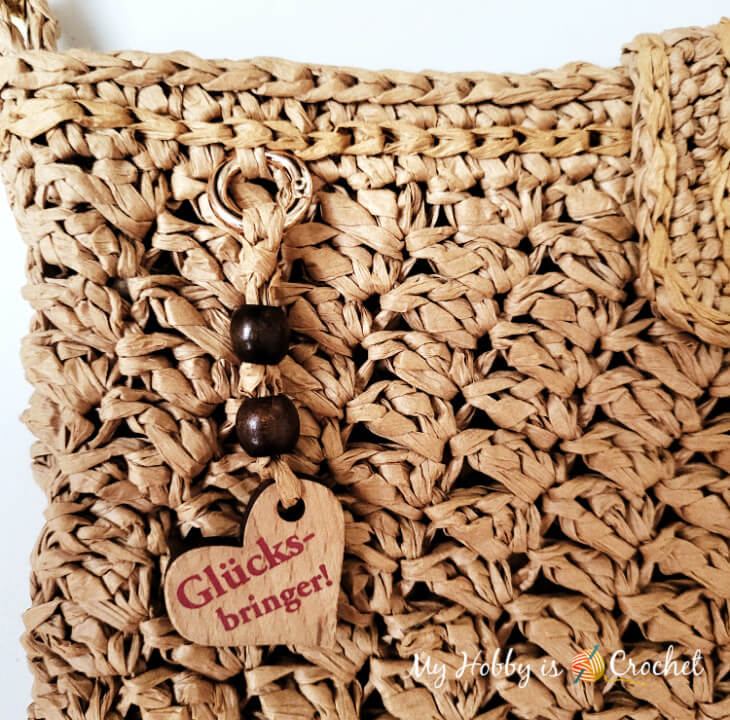
Weave in the Raffia ends going through the beads.
You can secure the Raffia ends with a bit of paper glue.
I hope you enjoy this pattern!
Check out also the matching Raffie Sun Hat!
For more free crochet patterns and tutorials, please visit my FREE Crochet Pattern Page!
Don't miss out new free crochet patterns, tutorials and other updates from My Hobby is Crochet! SUBSCRIBE to our FREE Newsletter and follow My Hobby is Crochet on Facebook, Pinterest ,Instagram and YouTube.
Raffie Crossbody Bag
Written Instructions and Pictures Copyright © April 2023 Kinga Erdem
This pattern is free for your personal use, you can sell the products of your work (no mass production), a link back to my blog would be appreciated. Do not use my photos for selling purposes or modify them in any way.
Please don't repost the pattern itself to any other sites, but please share the link to the pattern if you want to share the pattern with your friends. You may not give away copies of this pattern.
Do not make video tutorials or translate my pattern in other languages without my written consent!
Thank you,
Kinga


I love your Raffie Crossbody Bag and Hat set Kinga! Thank you for linking up at our weekly Link Party! You are being featured at our Wednesday
ReplyDeleteParty #504 this week. Here’s the direct link to the post in case you’d like to share your feature:
https://oombawkadesigncrochet.com/crochet-bows-raffie-crossbody-bag-diy-lunch-bag-link-party-504/
Hope to see you again next week! Rhondda