The Ballroom Clutch / Purse is the perfect accessory for weddings, parties, proms, banquets or other important occasions!
I wore it at an engagement party and I felt very fancy. It is absolutely an eye-catcher! I hope you will love it too!

| |
|
|
|
|
|
|

The Ballroom Clutch / Purse is the perfect accessory for weddings, parties, proms, banquets or other important occasions!
I wore it at an engagement party and I felt very fancy. It is absolutely an eye-catcher! I hope you will love it too!
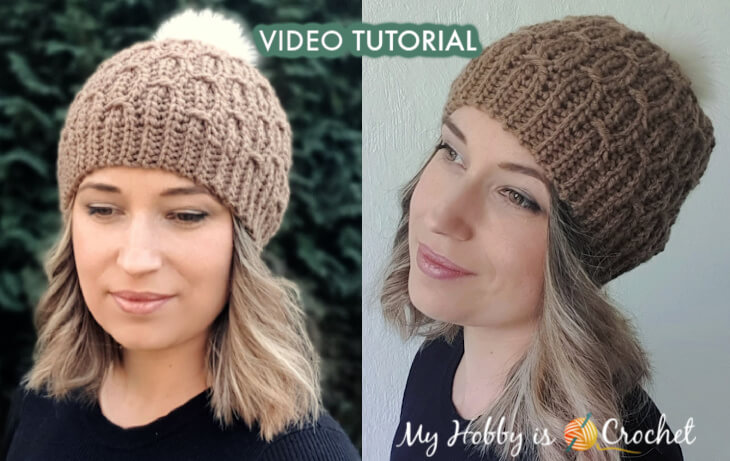
The Mock Cable Hat Video Tutorial will show you how to crochet this knit-look crochet hat in average woman size.
You can follow along with the free written pattern that was released here on My Hobby is Crochet blog, see the link below on this page!
(Other sizes are available also in the written instructions.)
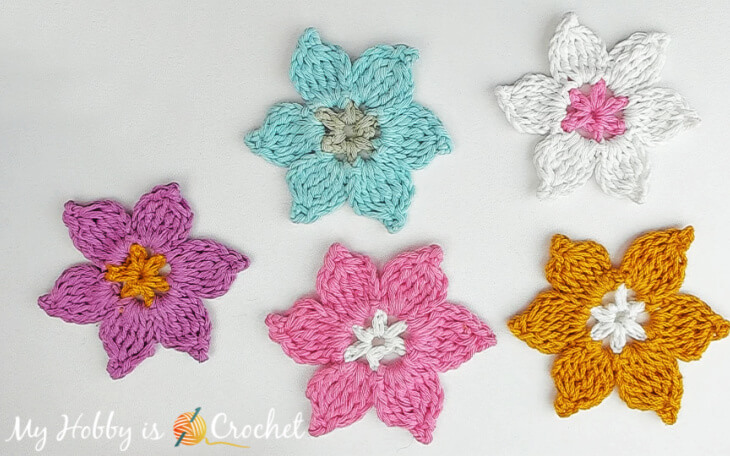
Learn how to crochet these pretty pointed petals flower with the free written instructions and video tutorial right here on My Hobby is Crochet!
In this post I will show you 2 ways of decreasing front post double crochet stitches! The first way is what I call an Invisible Decrease Front Post Double Crochet and the 2nd.one is the Front Post Double Crochet Two Together Decrease.

In this Video Tutorial I will show you how to crochet the "Double Layered Stars" Twist Headband/ Earwarmer.

Learn how to crochet graphs with the Bobble Single Crochet Stitch with the instructions and Video Tutorial on My Hobby is Crochet blog!
Meet the Girrafe block, worked with the Bobble Single Crochet stitch!

The Even Bobble Single Crochet Stitchor is a beautiful textured stitch pattern with two row repeats and the texture is built up from rows and columns of "bobbles". Learn how to crochet this beautiful stitch pattern with the free pattern and video tutorial on My Hobby is Crochet blog!

In this tutorial I will show you how to crochet the Star Stitch in the round, so that there are no visible seams and no gaps. I will also show you how to seamlesly change colors!

In this tutorial I will show you how to crochet the Back Crossed Half Double Crochet (bcr hdc) stitch and a pretty textured stitch pattern that I have made alternating one row of half double crochet (hdc) stitches with one row of bcr hdc, as seen in the picture below.

If you follow my blog, you might know that I love knit-look crochet stitches! Lately I've been experimenting and creating a stitch pattern that I call the Brick Stitch and Mock Cables with the Yarn Over Slip Stitch!

As it's name suggests, this beautiful honeycomb crochet scarf is reversible, it has a lovely drape and a wonderful texture - lacy, but also dimensional. I hope you will love it as much as I do!

This adorable ruffle skirt is crocheted using Red Heart Boutique Sassy Fabric, a soft fabric strip with evenly spaced holes you can crochet into.
One of the great things about the skirt, is that you will crochet the inner lining and the ruffles at once, working with both yarn and Sassy fabric at the same time.

It's again that wonderful time of year! Happy Nicholas Day! As tradition in Germany (and other European Countries) the 6th December is Saint Nicholas Day and the stockings (or boots) are filled with goodies overnight! The children who have behaved well during the year are receiving from Saint Nicholas small presents and sweets. :)
I have designed the Dreamy Stocking for my smallest one to take to Kindergarten for Nikolaus Day.
I hope that you (and your children) will love it as much as we do!

In my previous blog posts I have shown you how to crochet the perfect "Knit 1, Purl 1" Ribbing and the Crochet Stockinette Stitch using the yarn over slip stitch.
Now it's time to show you how to crochet the perfect "Knit 2, Purl 2" Ribbing!


If you follow along with my blog, you might have already learned how to crochet the knit look crochet stitches that I call the Yarn Over Slip Stitch (yo-slst) and the Yarn Over Slip Stitch Back Loops Only (yo-slst-blo).
These are not standard crochet terms, because I have not seen these stitches in any crochet stitch dictionary. They are some combination between half double crochet and slip stitch.
In this blog post I will show you how to crochet another variation of this stitch, the Yarn Over Slip Stitch worked into the 3rd Loop at Front (yo-slst into 3rd loop at front) or the Yarn Over Slip Stitch into 3rd loop below the front loop!


Spoil your feet with these comfy, super soft cable crochet slippers!

*Disclaimer: This post includes affiliate links and at no additional cost to you, I might earn a small commission if you decide to purchase through these links. Thank you!

Special stitches:
Round 1: ch 1, work 12 hdc into ring, join with sl st to top of first hdc. (12 sts)
Round 2: ch 2, *1 dc into top of next st, 1fpdc around the same st as the dc just made, repeat around from *, join with sl st to top of first st. (24 sts)

Round 3: ch 2, 1 fpdc around each of next 5 sts, (1dc into top of next st, 1 fpdc around same st) x 2 times, 1 fpdc around each of next 10 sts, (1dc into top of next st, 1 fpdc around same st) x 2 times, 1 fpdc around each of next 5 sts; join with sl st to top of first fpdc. (28 sts)

Round 4: ch 2, 1 fpdc around each of next 6 sts, (1dc into top of next st, 1 fpdc around same st) x 2 times, 1 fpdc around each of next 12 sts, (1dc into top of next st, 1 fpdc around same st) x 2 times, 1 fpdc around each of next 6 sts; join with sl st to top of first fpdc. (32 sts)
Round 5: ch 2, 1 fpdc around each of next 7 sts, (1dc into top of next st, 1 fpdc around same st) x 2 times, 1 fpdc around each of next 14 sts, (1dc into top of next st, 1 fpdc around same st) x 2 times, 1 fpdc around each of next 7 sts; join with sl st to top of first fpdc. (36 sts)
The toe of the slippers is finished! It should look like this:
Round 6: ch 2, work 1 fpdc around each of next 9 sts, 1 bpdc around each of next 5 sts, then start cable:
sk next 2 sts , work 1 fptr around each of next 2 sts; going behind the 2 fptr just made, work 1 dc into each of the 2 skipped sts, sk next 2 fpdc, work 1 dc into each of next 2 sts;
now place a st marker around the st were you worked the last dc!;
going in front of the 2 dc just made, work 1 fptr around each of the 2 skipped sts - cable sts are done;
starting with the first st after the marked st, work 1 bpdc around each of next 5 sts, 1 fpdc around each of next 9 sts, join with sl st to top of first fpdc. (36 sts)

Round 7: ch 2, work 1 fpdc around each of next 9 fpdc, 1 bpdc around each of next 5 bpdc, then work 1 fpdc around each of 8 sts of the cable, work 1 bpdc around each of next 5 bpdc, 1 fpdc around each of next 9 fpdc, join with sl st to top of first fpdc. (36 sts)

Round 8: ch 2, work 1 fpdc around each of next 9 fpdc, 1 bpdc around each of next 5 bpdc, work Cable: sk next 2 fpdc, work 1 fptr around each of next 2 sts, going behind the 2 fptr just made, work 1 dc into each of the 2 skipped sts, sk next 2 fpdc, work 1 dc into each of next 2 sts, going in front of the 2 dc just made, work 1 fptr around each of the 2 skipped fpdc sts; then work 1 bpdc around each of next 5 bpdc, 1 fpdc around each of next 9 fpdc; join with sl st to top of first fpdc. (36 sts)
Repeat as rounds 7-8 until you have 7 complete cables, ending with a round 8 repeat.
Cut yarn. Fasten off. Your piece should look like in the picture below (top and bottom view):

Note: You can adjust the lenght of the piece (making more/less round of cables) until it fits your foot as in the picture below:

Start working in rows:
Row 1 (right side): Counting from right to left on the last round you made, join yarn with a standing fpdc around the 7th fpdc of the cable;
1 fpdc around next fpdc, 1 bpdc around each of next 5 bpdc, 1 fpdc around each of next 18 fpdc (be careful to not work around the ch2 in the middle of the foot), 1 bpdc around each of next 5 bpdc, 1 fpdc around each of next 2 fpdc; ch 2, turn. (32 sts)


Row 2 (wrong side) : 1 bpdc around each of next 2 sts, 1 fpdc around each of next 5 sts, 1 bpdc around each of the next 18 sts, 1 fpdc around each of next 5 sts, 1 bpdc around each of 2sts, ch 2, turn. (32 sts)
Row 3 (right side): ch2, 1 fpdc around next 2 sts, 1 bpdc around each of next 5sts, 1 fpdc around each of next 18 sts, 1 bpdc around each of next 5 sts, 1 fpdc around each of next 2 sts; ch 2, turn. (32 sts)
Repeat as rows 2-3, until you have 23 ridges beginning with the first cable round, ending with a row 2 repeat on wrong side.
(Or adjust the lenght making more/ less rows until the slippers is 1 inch shorter as your leg. )
Shaping the Heel with Decreases:
You wil crochet 2 rows with decreases in the middle of the piece. Each decrease row you will decrease 4 sts.
Row 1: On right side: ch2, 1 fpdc around each of next 2 sts, 1 bpdc around each of next 5 sts, 1 fpdc around each of next 5 sts, 1dec-fpdc × 4 times, 1 fpdc around each of next 5 sts, 1 bpdc around each of next 5 sts, 1 fpdc round each of next 2 sts. (28 sts)

Row 2: On wrong side: ch2, 1 bpdc around each of next 2 sts, 1 fpdc around each of next 5 sts, 1 bpdc around each of next 3 sts, 1 dec-bpdc × 4 times, 1 bpdc around each of next 3 sts, 1 fpdc around each of next 5 sts, 1 bpdc around each of next 2 sts. ( 24 sts)
Cut yarn leaving a long tail that will be used to sew the sides together.

Seaming the Heel:
Thread yarn needle with the long tail. Holding the piece on the right sides so that the sts on the edge of each side align themself. We will seam around the post of the sts on each side, not into top of the sts. This way the seam will be almost invisible, imitating the front post sts.
Seam the sides at heel inserting the needle around the post of the stitches on each side this way:
- for the front post sts part: insert needle from front to back around the post of the sts on both sides
- for back post sts part: insert needle from back to front around the sts of the side nearest to you and from front to back around the sts of the other side.

Seam any holes created by the decrease sts. Cut yarn. Fasten off.
Make another slipper the same way.
I hope you enjoy this pattern!
For more free crochet patterns and tutorials, please visit my FREE Crochet Pattern Page!
Don't miss out new free crochet patterns, tutorials and other updates from My Hobby is Crochet! Subscribe to our FREE Newsletter and follow My Hobby is Crochet on Facebook, Pinterest, Instagram and YouTube.
CHIC CABLE SLIPPERS PATTERN
Written Instructions and Pictures - Copyright © 2018 Kinga Erdem
This pattern is free for your personal use, you can sell the products of your work, a link back to my blog would be appreciated. Do not use my photos for selling purposes or modify them in any way.
Please don't repost the pattern itself to any other sites, but please share the link to the pattern if you want to share the pattern with your friends. You may not give away copies of this pattern.
Do not make video tutorials or translate my pattern in other languages without my written consent!
Thank you.
Kinga

