If you follow along with my blog, you might have already learned how to crochet the knit look crochet stitches that I call the Yarn Over Slip Stitch (yo-slst) and the Yarn Over Slip Stitch Back Loops Only (yo-slst-blo).
These are not standard crochet terms, because I have not seen these stitches in any crochet stitch dictionary. They are some combination between half double crochet and slip stitch.
In this blog post I will show you how to crochet another variation of this stitch, the Yarn Over Slip Stitch worked into the 3rd Loop at Front (yo-slst into 3rd loop at front) or the Yarn Over Slip Stitch into 3rd loop below the front loop!
*Disclaimer: This post includes affiliate links and at no additional cost to you, I might earn a small commission if you decide to purchase through these links. Thank you!
The yarn was provided by Red Heart Yarns.
Don't lose this Crochet Tutorial!
~ Pin it here! ~
The ribbing created with the yo-slst into 3rd loop at front looks almost identical with the yo-slst-blo ribbing! Just see the picture below!
The blue sample is made using yo-slst into 3rd loops at front and the green sample is made using the yo-slst-blo!
Both of these crochet ribbings are reversible and the sts worked in rows will create horizontal ribs, but once you will flip your work on the vertical you will get the vertical ribs that resemble to the knit ribbing knit 1 purl 1!
While the ribbing made with the yo-slst-blo is stretchy, the ribbing created with the yo-slst in 3rd loops is more dense and has barely stretch.
For hat brims or cuffs that need elasticity, I would recommend using the yo-slst-blo!
Just try both stitches and see which one do you prefer! Let me know in the comment boxes at the end of this post!
STITCHES AND ABBREVIATIONS (US TERMS):
- ch: chain
- back bump of chains- See my picture tutorial.
- slst: slip stitch
- blo: back loop only
- st: stitch
- yo: yarn over
- yo-slst: yarn over-slip stitch (shown below)
- yo-slst 3rd loop at front or yo-slst into 3rd loop below the front loop: yarn over-slip stitch into 3rd loop at front (shown below)
SUPPLIES: For this tutorial I have used Red Heart Soft yarn and a 5 mm/ G hook!
Now let’s see how to crochet into the 3rd.loop at the front of the yo-slst!
INSTRUCTIONS:
Start with a foundation chain of your desired length.
Row 1:
(For a nice looking edge, work the first row inserting the hook into theback bump of chains as seen below!)
a) First stitch:
- Yarn over (yo) and insert the hook into 2nd chain from hook
- Yarn over and draw the yarn through the chain.
- You have now 3 loops on the hook, the same as when you’ll work a half double crochet.
Stop! Do not yarn over again to complete a half double crochet! Instead go the the step below.
- Having the 3 loops on hook, pull/slip the first loop on hook through the next 2 loops on hook to complete a Yarn Over Slip Stitch (yo-slst).
b) Work the same for the next stitches:
*- yo and insert the hook into next chain (or stitch for the next rows)
- yo and pull through the chain/ stitch.
- You have now 3 loops on the hook. Pull the first loop on hook through the next 2 loops on hook to complete the stitch.*
Repeat across from * to* to end of foundation chain.
This is how the first completed row will look like:
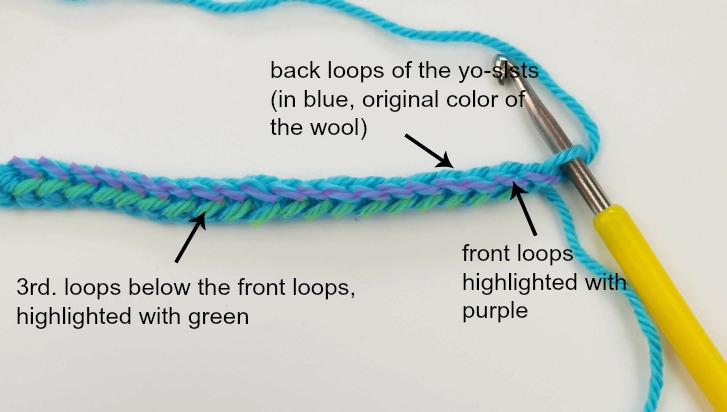
NOTE: If you pay attention to the yo-slst, you’ll notice that there are 3 loops: two top loops (front and back loop) and a loop below the front loop.
Starting with the second row you’ll work each stitch inserting the hook into the 3rd.loop below the front loop (highlighted with green in the picture below)!
Row 2:
Ch1 tight (this is to prevent the ribbing to overstretch on the edge), turn;
Working into 3rd loop below the front loop, yo-slst into first st and yo-slst into 3rd loop at front into each stitch across the row.
You notice that the knit look ridges are pushed to the back of the work.
If you turn your work, you'll see the knit look ridges:
Work all the next rows as row 2, inserting the hook into the 3rd.loop at the front of the sts.
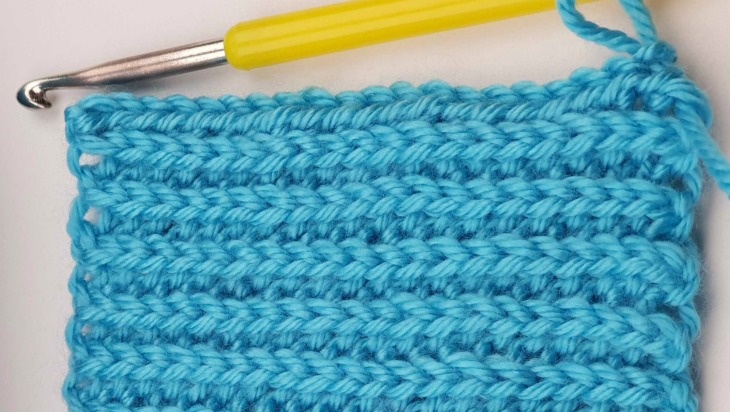
After a few rows, your ribbing will look like this:
Flip your work to the vertical and admire your knit look crochet ribbing!
I hope you enjoyed this tutorial! For more free crochet patterns and tutorials, please visit my FREE Crochet Pattern Page!
Happy Crocheting,
Kinga
Knit Look Ribbing - Yarn Over Slip Stitch into 3rd. Loop at the Front
Written Instructions and Pictures Copyright© 2018 Kinga Erdem
Don't miss out new free crochet patterns, tutorials and other updates from My Hobby is Crochet! Subscribe to our FREE Newsletter and follow My Hobby is Crochet on Facebook, Pinterest , Bloglovin , Google+, Instagram and Twitter.


