How to turn regular HDC stitches into knit alike stitches (working in rows and in rounds, color change and almost invisible seams)
With a little trick you can transform regular half double crochet stitches into knit alike stitches, that are also very stretchy!
")
You will work the hdc stitches as usual, the only difference is that you will insert the hook not into the top loops of the stitches, but into a „hidden“ 3rd loop!
You probably know that all crochet stitches have 2 top loops: front loop and back loop, as pictured below!

When working in rounds, if you'll flip your work on the vertical, your crochet piece will look like a perfect knit stockinette stitch.
When working in rows, if you'll flip your work on the vertical, your crochet piece will almost look like a knit ribbing made of (2 knit, 1 purl) stitch repeat.

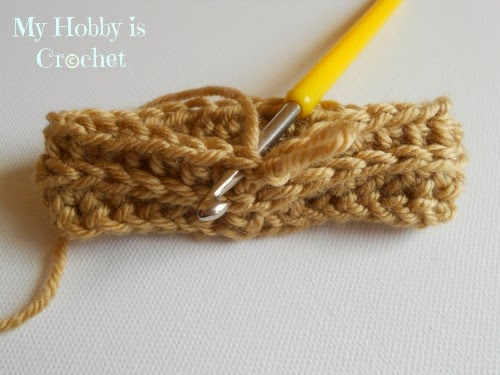
A. When working in rows the 3rd hidden loop will be placed in front of the work, under the front loop of stitches, at the left side of the stitch.

(Note: The knit alike braiding will be visible only on the right side of the work)

3) Row 3: On the right side you will see the top 2 loops and the „hidden“ 3rd loop at the front. This time you will not work into the „hidden“ loop, you will work into the the back loop of hdc stitches!
Ch1, hdc back loop only (blo) into first st and hdc blo in each st across. (At the last stitch work into both top loops for more stability of the st and to avoid gaps)
Repeat row 2 and 3 until the desired length.


Round 1: In this example I started with a chainless sc foundation row, joining into round with sl st to top of first st. (Alternative you can work a foundation chain, join with sl st into round and then work one round of sc.)
Round 2: ch1, 1 hdc into same st and 1 hdc into each st around, join with sl st into top of first hdc.
Round 3: ch1. Work hdc into 3rd „hidden“ loop at the back of work, under back loop of each st around, join with sl st to top of first st.


- release yarn from hook,

- insert hook from back to front under the 2 top loops of the first st where you have joined into round.

- pick the working loop with the hook

and pull it through the back of work.

Release the hook, untwist the yarn, insert hook again, Ch 1 and continue working the same way as for Version I, repeating all the steps from * after each joining into round. You will still have a diagonal seam, but not that obvious as the first version! Continue to read to find out how to get rid of the seams!
Color changes for Version II:
You will make your color changes when you'll join into round, slip stitching into round with new color yarn and repeat all the steps from *.


UPDATE September 2014
Version III Perfect Seamless Rounds!!
After many tries, I found a way to obtain perfect seamless rounds!
This is how it works: crochet hdc sts in the 3rd loop working in continuous spiral rounds, without joining with sl st at the end of the rounds.
You will need to place a stitch marker into the top loops of the first stitch from the round, moving the st marker from round to round as you work.
Each round the first st will be worked behind the stitch marker, then remove the stitch marker and place it into the first stitch just made.
I used this technique in my free pattern "Bella Bricks Wristers"!
The mitts have no seams, excepting the first round worked with hdc into the hidden loop, where the spiral begins.

Don't miss out new free crochet patterns, tutorials and other updates from My Hobby is Crochet! Subscribe to the FREE Newsletter and follow My Hobby is Crochet on Facebook, Pinterest, Twitter, Google+ and Instagram.
")
You will work the hdc stitches as usual, the only difference is that you will insert the hook not into the top loops of the stitches, but into a „hidden“ 3rd loop!
You probably know that all crochet stitches have 2 top loops: front loop and back loop, as pictured below!

The hdc stitches have a 3rd „hidden“ loop, under the top loops. This "hidden" loop will be placed at the front or at the back of your working piece, depending if you're working in rows or in the round.
The look of the crocheted piece worked in the round will be slightly different from the one worked in rows.
The look of the crocheted piece worked in the round will be slightly different from the one worked in rows.
When working in rounds, if you'll flip your work on the vertical, your crochet piece will look like a perfect knit stockinette stitch.
When working in rows, if you'll flip your work on the vertical, your crochet piece will almost look like a knit ribbing made of (2 knit, 1 purl) stitch repeat.

Start with any number of foundation chains.
1) Row 1: start with a hdc in 3rd chain from hook, then work hdc stitches, as usual in each st across. This will be the right side of the work!
2) Row 2 (on the wrong side of work): ch 1, work a hdc inserting the hook into the 3rd „hidden“ loop at the front of the work, under the front loop of first st (at the left of the first st). Work all the next hdc sts of the row the same way, inserting the hook into the 3rd hidden loop at the front of the work. The last st will be worked into the ch3.

(Note: The knit alike braiding will be visible only on the right side of the work)

Ch1, hdc back loop only (blo) into first st and hdc blo in each st across. (At the last stitch work into both top loops for more stability of the st and to avoid gaps)
Repeat row 2 and 3 until the desired length.


B. When working in the round, the 3rd „hidden“ loop will be placed at the back of the work, under the back loop of stitches. Each round you will work hdc sts into that 3rd „hidden“ loop.

Version I (normal joining) 
Round 1: In this example I started with a chainless sc foundation row, joining into round with sl st to top of first st. (Alternative you can work a foundation chain, join with sl st into round and then work one round of sc.)
Round 2: ch1, 1 hdc into same st and 1 hdc into each st around, join with sl st into top of first hdc.
Round 3: ch1. Work hdc into 3rd „hidden“ loop at the back of work, under back loop of each st around, join with sl st to top of first st.

Repeat round 3 until the desired length.

You can see that the top and the bottom are quite symmetric. Start with more chains and use this pattern to make some pretty knit looking crochet projects, like a headband, cowl or an infinity scarf.
The joinings are quite visible worked this way, looking like small knots! That's why I tried a trick to hide the joining as much as possible.

Version II (with almost invisible joining):

Worked the same way as Version I, the only difference is that you'll make some extra steps * after joining with sl st to top of first st:
- release yarn from hook,

- insert hook from back to front under the 2 top loops of the first st where you have joined into round.


Release the hook, untwist the yarn, insert hook again, Ch 1 and continue working the same way as for Version I, repeating all the steps from * after each joining into round. You will still have a diagonal seam, but not that obvious as the first version! Continue to read to find out how to get rid of the seams!
You will make your color changes when you'll join into round, slip stitching into round with new color yarn and repeat all the steps from *.


Version III Perfect Seamless Rounds!!
After many tries, I found a way to obtain perfect seamless rounds!
This is how it works: crochet hdc sts in the 3rd loop working in continuous spiral rounds, without joining with sl st at the end of the rounds.
You will need to place a stitch marker into the top loops of the first stitch from the round, moving the st marker from round to round as you work.
Each round the first st will be worked behind the stitch marker, then remove the stitch marker and place it into the first stitch just made.
I used this technique in my free pattern "Bella Bricks Wristers"!
The mitts have no seams, excepting the first round worked with hdc into the hidden loop, where the spiral begins.

I hope that you have enjoyed this tutorial! For more free crochet patterns and tutorial check out my Free Pattern Page!
Don't miss out new free crochet patterns, tutorials and other updates from My Hobby is Crochet! Subscribe to the FREE Newsletter and follow My Hobby is Crochet on Facebook, Pinterest, Twitter, Google+ and Instagram.


I truly love your blog.. Excellent colors & theme.
ReplyDeleteDid you create this website yourself? Please reply
back as I?m trying to create my own personal website and would
love to know where you got this from or just what the
theme is called. Thanks!
Thank you. I chose a basic theme from Blogger and made my own customizations with html codes.
ReplyDeleteVery nice post. I just stumbled upon your blog and
ReplyDeletewished to say that I've truly enjoyed surfing around your blog posts.
After all I'll be subscribing to your feed and I hope you write again soon!
Thank you so much! I'm glad you enjoyed it :)
DeleteMerely wanna tell that this is very helpful, Thanks for taking your time to write this.
ReplyDeleteYou're very welcome! I'm glad that my tutorial could help you!
DeleteI like this website so much, saved to bookmarks.
ReplyDeleteThankfulness to my father who stated to me about this webpage, this weblog
ReplyDeleteis in fact awesome.
I enjoyed reading your tutorials, They do make a welcome difference for a perfect finish
ReplyDeleteThanks for great tutorial. I made a very beautiful hat and scarf for my cousin, using this stich.wish you the best
ReplyDelete