
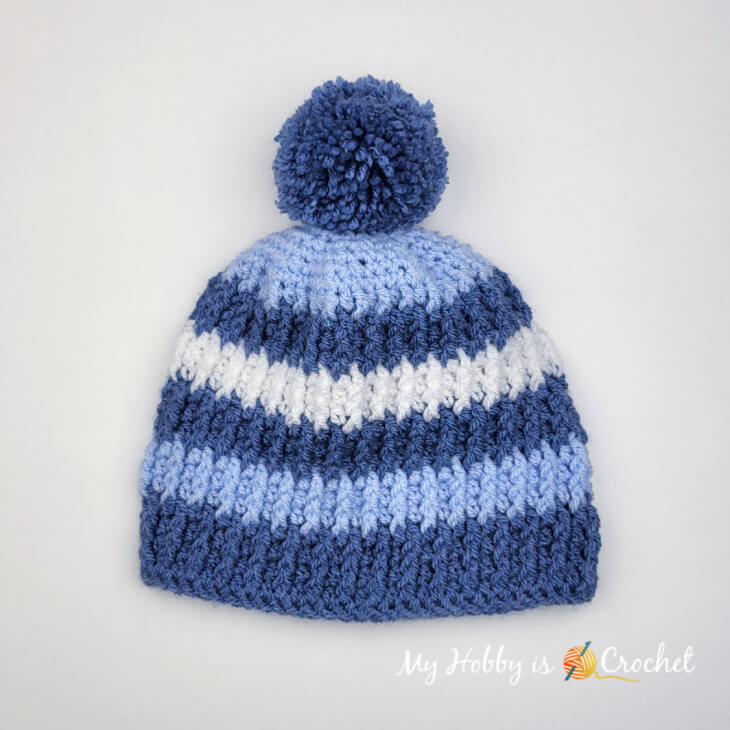
This crochet toddler hat and cowl set pattern was designed especially for my little nephew Ianis, who came with his parents from a long distance to visit us.
My sister asked for a textured hat with multiple color stripes, so this is what I came up with.

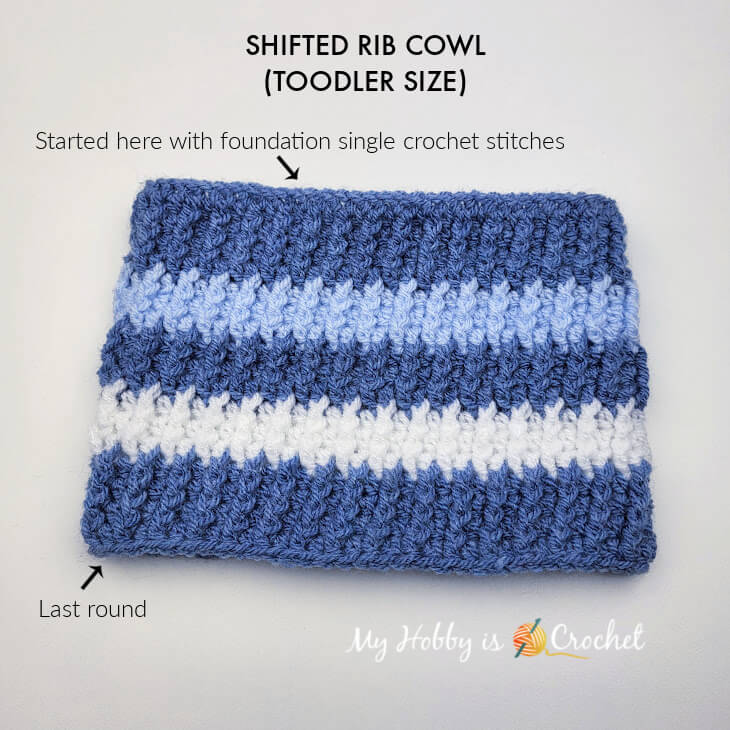
I have made a cowl to match, following the same pattern (but starting with more stitches) and using the same color sequence.
I love how it turned up! Ianis looks so cute wearing his brand new crochet hat and cowl set! ♥
*Disclaimer: This post includes affiliate links and at no additional cost to you, I might earn a small commission if you decide to purchase through these links. Thank you!

Shifted Rib Hat & Cowl
This crochet hat pattern is worked from the bottom-up, starting with a row of foundation single crochet stitches instead of foundation chains. This will make the edge of the brim more stretchy.
After reaching the desired number of foundation sc stitches, you will join with slip stitch into round and from there you will work in joined rounds.
The top of the hat will be shaped with some decrease rounds.
HAT SIZE
Toddler: 1-3 yearsHat height: 7 inches (17,80 cm)
Hat circumference: 17 inches (43 cm)
The hat allowes 2 inch of stretch (negative ease) from the head size to the hat size.
COWL SIZE
Height: approx. 6 inches (15 cm)Circumference: 18 inches (43 cm)
GAUGE
4 sts and 3 rounds = 1" × 1" (2,5 cm × 2,5 cm)
SUPPLIES:
- The Yarn:
For this hat I was used Stylecraft Special for Babie DK yarn from Love Crafts
Yarn weight: DK
Ball weight: 100g (3.5oz)
Length: 275m (301yds)
To make the set in 3 colors as I did, you will need one skein in each color, but you will have plenty of yarn left over from each skein.
I have used the colorways: Denim (here Color A), Baby Blue (Color B) and White (Color C).
If you will make it just in one solid color, one skein of 100 g should be enough to crochet both the hat and the cowl.
You can also use Stylecraft Special DK yarn, or any other DK weight yarn that meets the gauge. - 4.5 mm crochet hook
- 2.5" Clover Pompom Maker
- yarn needle
- scissors
STITCHES AND ABBREVIATIONS (US TERMS)
ch: chainfsc: foundation single crochet
See this Video Tutorial by Moogly!
st: stitch
slst : slip stitch
sc: single crochet
decsc: decrease single crochet:
insert the hook into next stitch, yarn over, pull up a loop,
insert hook into next stitch, yarn over and pull up a loop;
you have 3 loops on the hook, yarn over and pull through all 3 loops on the hook to complete the decrease. So from 2 stitches you made one stitch.
hdc: half double crochet crochet
dc: double crochet
fpdc: front post double crochet: Yo, insert your hook from front to back to front around the post of the next stitch, yo, pull up a loop, yo, pull thru 2 loops on your hook, yo, pull thru remaining two loops on your hook.
Seamless join in the round of foundation stitches -> See this Video Tutorial by Moogly!
*to* repeat the sequence of the stitches between the two *
NOTES
- the ch1 and the ch2 at beginning of the rounds will not count as stitches
- Changing colors: at the end of the round, work the last stitch in the current color, then change to next color when slip stitching to join into round. Continue the next round with the new color.
Do not cut yarn when changing colors! Carry the yarn color(s) not in use up, each round hold all the yarn strands not in use together and when joining into round slip stitch around them with the new color to prevent long loops. - When working the decreases to shape the crown of the hat, make sure the decrease stitches are made tight. This will prevent having gaps.
HAT INSTRUCTIONS
With A and hook 4.5 mm work 60 fsc; making sure that you don't twist the foundation sc row, join into ring by slst-ing to top of 1st fsc.
You will have a small gap at the bottom half between the first and last stitch. Don't worry, you will close the gap later!
From now on you will work in the round.
Round 1: ch1, 1 hdc in each st around, slst to top of 1st hdc. (60 sts)
Round 2: ch 2, *1 fpdc around 1st st, 1 hdc into top of next st*, repeat from *to* around, join with slst to top of 1st fpdc.
Rounds 3-4: ch 2, *1 fpdc around 1st fpdc, 1 hdc into top of next hdc*, repeat from *to* around, join with slst to top of 1st fpdc. At the end of round 4 change to color B when slip stitching to join.Continue with B.
Round 5: ch 1, *1 hdc into top of next fpdc, 1 fpdc around next hdc*, repeat from *to * around, slst to top of 1st. hdc. (60 sts)
Rounds 6-7: ch 1, *1 hdc into top of next hdc, 1 fpdc around next fpdc*, repeat from *to * around, slst to top of 1st. hdc. (60 sts)At the end of row 7 change to A when slip stitching to join into round .
Rounds 8-10: with A same as Rows 2-4
At the end of row 10 change color C when slip stitching to join.
Rounds 11-13: with C same as rounds 5-7
At the end of row 13 change color A when slip stitching to join.
Rounds 14 -16: Continue with A as rounds 2-4.
At the end of row 16 with A, change to B when joining into round.
Crown shaping
Before shaping the top I have 5 color stripes.Round 17: With B ch1, *1 decsc, 1 sc in each of next 5 sts*, repeat from *to* around, join with slst to top of 1st decrease st. (54 sts)
Round 18: ch1, *1 sc in each of next 4 sts, 1 decsc*, repeat from *to* around (48 sts)
Round 19: ch1, *1 decsc, 1 sc in each of next 3 sts*, repeat from *to* around, join with slst to top of 1st decrease st. (42 sts)
Round 20: ch1, *1 sc in each of next 2 sts, 1 decsc*, repeat from *to* around (36 sts)
Round 21: ch1, *1 decsc, 1 sc in next st*, repeat from *to* around, join with slst to top of 1st decrease st. (30 sts)
Round 22: dec every next 2 sts. ( 15 sts)
Cut yarn leaving a tail that will be used to close to hole on top of the hat.
Closing the hole on top of the hat
Thread yarn needle with the yarn tail left at the end of the work, weave yarn through the top edge stitches at top of hat. Cinch together to close space, and fasten securely. Weave in all ends.
Closing the gap at the bottom of the hat
With the yarn tail at the beginning of the work, use the seamless join in the round to close the gap.
Make a yarn pompom using a small pompom maker, or a cardboard. Sew the pompom to the hat top.
COWL INSTRUCTIONS
Work 64 Fsc, join into ring with slst.
Follow the pattern from Hat rounds 1-16.
Round 17: To balance out the width of the last stripe with the first stripe, add an additional last round same as the previous one.
Cut yarn. Fasten off. Weave in all ends.
I hope you enjoy these crochet hat and cowl patterns!
For more free crochet patterns and tutorials, please visit my FREE Crochet Pattern Page!
Don't miss out new free crochet patterns, tutorials and other updates from My Hobby is Crochet! Subscribe to our FREE Newsletter and follow My Hobby is Crochet on Facebook, Pinterest, Instagram and YouTube.
Shifted Rib Hat & Cowl Set
Written Instructions and Pictures - Copyright © October 2022 Kinga Erdem
This pattern is free for your personal use, you can sell the products of your work, a link back to my blog would be appreciated.
Do not use my photos for selling purposes or modify them in any way.
Please don't repost the pattern itself to any other sites, but please share the link to the pattern if you want to share the pattern with your friends.
You may not give away copies of this pattern.
Do not make video tutorials or translate my pattern in other languages without my written consent!
Thank you.
Kinga

Hi Kinga! I love your new Shifted Rib Hat and Cowl set. Your model looks adorable in them! Thank you for linking up at our weekly Link Party! You are being featured at our Wednesday Party #475 this week. Here’s the direct link to the post in case you’d like to share your feature:
ReplyDeletehttps://oombawkadesigncrochet.com/shifted-rib-crochet-hat-knit-burlington-hat-cosy-easy-sew-socks-link-party-475/
Best wishes, Rhondda
How many chains do you do to make the shifted rib hat for adults?
ReplyDelete