
To make this scarf, you don’t need to know how to knit or how to crochet! Yes, that' right! Because the Strawberry Waffle Loop It Scarf it's made without any needles or crochet hook! You will only use your fingers and the new Loop It Yarn from Red Heart!

*Disclaimer: This post includes affiliate links and at no additional cost to you, I might earn a small commission if you decide to purchase through these links. Thank you!
The yarn was provided by Red Heart Yarns.
The Loop It - Yarn is a super soft, chenille type of yarn and even if it's Jumbo yarn weight, the items made with it are very light.
This yarn is made out of loops and you only need to pull the loops through one another to create knit look projects. The basic loop it stitches are just like the ones used for knitting: the loop it knit and the loop it purl.

SUPPLIES:
- Scissors
- 2 Balls of Loop It yarn from Red Heart, colorway shown “In the Pink”. (There are 12 colorways available)

GAUGE: It's made by the yarn loops. Not important here.
FINISHED SIZE:
163 cm long and 17 cm wide.
You can make a shorter/ longer scarf by making less/ more rows as in the pattern indicated.
STITCHES AND ABBREVIATIONS USED:
St = stitch
K = loop it knit st= with the working yarn in back, pull loops from working yarn through loops of previous row from back to front
Watch Marly Bird’s Video Tutorial for the Loop it Knit below:
Watch Marly Bird’s Video Tutorial for the Loop it Purl below:
IMPORTANT NOTES:
1) You will never turn your work, you will always work with the right side facing you, alternating working one row from right to left and one row from left to right.
2) In order to have a beautiful edge (as a knit st), after working the first and last st of each row, you will bring the yarn behind the first stitch to make the second st and behind the last st to begin the new row.( If the 2nd st needs to be a purl st, you will first bring the working yarn behind the first st and then to the front of the second st of previous row). Make the same for the last st to begin the new row. Otherwise, the edge sts will look like knots!
3) The pattern is not hard, only a bit wordy.
Before you begin with the pattern, make sure to learn how to make the sts involved watching Marly's Video Tutorials above!

Strawberry Waffle - Loop it Scarf
INSTRUCTIONS:
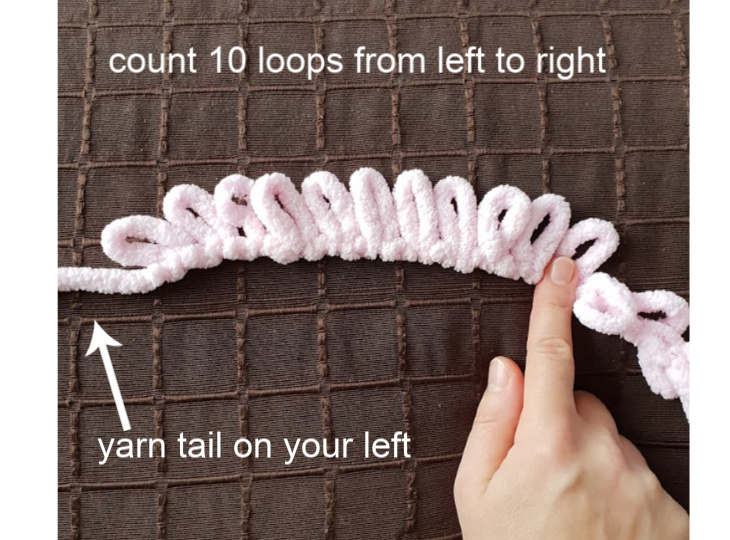
To begin snip the first 2 loops from your yarn end to ensure you have a yarn tail.
Base row: With the yarn tail on your left, count the first 10 loops and lay them on a flat surface with the loops facing upwards.
Row 1 (Combined sts row):
Working from right to left:
Step 1: With the working yarn in back, pull the 11th loop (from working yarn) up through 10th loop (last loop of base row) from behind to create a knit st.

Step 2: *Bring the working yarn to the front and pull the next loop from working yarn through next loop of foundation row from front to back to create a purl st.
Step 3: With the working yarn in front pull the next loop from working yarn through next loop of foundation row from front to back to create a purl st.
The picture below is showing two purl loops created in steps 2 and 3.

Step 4: Bring the working yarn to back and pull the next loop from working yarn through next loop of foundation row from back to front to create a knit st.
Repeat from * till end of row! ( 10 sts in row)
That means that you will alternate 1 knit st with 2 purl sts, ending the row with 1 knit st:
k1, p2, k1, p2, k1, p2, k1. ( 10 sts total)
Do not turn your work!

Row 2 (Combined sts row):
Working from left to right, with working yarn in back, pull next loop from working yarn up from behind through last stitch worked on previous row as for a knit st.
*Bring the working yarn to the front and pull the next loop from working yarn through next st from front to back as for purl st.
With the working yarn in front pull the next loop from working yarn through next st from front to back to create a purl st.
Bring the working yarn to back and pull the next loop from working yarn through next st from back to front to create a knit st.
Repeat from * till end of row! ( 10 sts in row)
Simplified version: k1, p2, k1, p2, k1, p2, k1. ( 10 sts total)
Do not turn your work!

Row 3 (knit st row):
Working from right to left and with the working yarn in back, pull next loop from working yarn up from behind through last stitch worked on previous row to create a knit st.
*Pull next loop from working yarn up from behind through next stitch to create a knit st. Repeat from * across to end of row.
( 10 knit sts total)
Do not turn your work!

Continue alternating 2 rows of combined sts ( as row 2) with one row of knit sts (as row 3). The only difference will be the direction of work from left to right or right to left:
Row 4: as row 2 worked from left to right
Row 5: as row 2, but worked from right to left
Row 6: as row 3, but from left to right
Row 7: as row 2 worked from right to left
Row 8: as row 2 worked from left to right
Row 9: as row 3 worked from right to left
Repeat rows 4-9.
HOW TO ATTACH THE SECOND BALL OF YARN:
With the scissors snip the last loop of your first ball of yarn to make a yarn tail,
snip the first loop of your second ball of yarn to make a yarn tail,
double knot the yarn tails you just made close together, so that the last loop of the first ball is right beside the first loop of the second yarn ball! ( You will hide the tails when finishing the project!)
Make the scarf as long as you like, then cast off after the first combined sts row.
HOW TO CAST OFF:
The cast off row will be a combined st (knit and purl) cast off row!
Cast off the knit sts of previous row from back to front as for knit sts and the purl sts of previous row from front to back as for purl sts, like this:
Knit the first st,
purl the second stitch,
now pull the purl st just made through the first knit st,
purl the next st , then pull it through the previous bind off loop,
knit the next st and then pull it through the previous bind off loop;
*purl the next st , then pull it through the previous bind off loop,
purl the next st , then pull it through the previous bind off loop,
knit the next st and then pull it through the previous bind off loop; repeat from * till end of row.
Snip the next loop on the working yarn to make a tail and pull the yarn tail through the last working loop.
See below Marly’s Video how to cast off, but apply the instructions I gave you above! She is showing you a knit cast off row!
FINISHING:
With your fingers or with the help of a crochet hook, weave in all ends.
I hope you enjoy this pattern!
For more free patterns and tutorials, please visit my FREE Pattern Page!
Share your projects and get support in our Facebook Group My Hobby is Crochet!
Don't miss out new free crochet patterns, tutorials and other updates from My Hobby is Crochet! Subscribe to our FREE Newsletter and follow My Hobby is Crochet on Facebook, Pinterest, Bloglovin, Google+,
Instagram and Twitter.
Strawberry Waffle Loop it Scarf - Written Instructions and Pictures
Copyright © 2018 Kinga Erdem
This pattern is free for your personal use, you can sell the products of your work, a link back to my blog would be appreciated. Do not use my photos for selling purposes or modify them in any way.
Please don't repost the pattern itself to any other sites, but please share the link to the pattern if you want to share the pattern with your friends. You may not give away copies of this pattern.
Do not make video tutorials or translate my pattern in other languages without my written consent!
Thank you.
Kinga
Super Awesome Loop Yarn Scarf , Hope You Make More Loop Yarn Projects,Loop Yarn is So Super Awesome,Easy to use & Really Fun to do .😀❣
ReplyDeleteThank you! I'm so glad you like it! :)
Delete